
This guide shows how to deploying Adobe Reader DC with Endpoint Manager
Prerequisites
Newest Adobe Reader DC setup file, can be downloaded From this link Save this in c:\temp\
The Adobe Reader Customisation Wizard, can be downloaded From this link, And install it on your machine, we need it later.
The Microsoft Win32 Content Prep Tool, can be downloaded, From this link
Unpack Adobe Reader DC files
We need to unpack the installation files from the .EXE file
Open a Command prompt
Change directory to C:\temp\
cd c:\temp\
Then start unpacking the file with this command;
.\AcroRdrDC2100720099_en_US.exe -sfx_o"c:\temp\adobe\" -sfx_ne
Remember to replace the file name in the command, to fit your install file

Click Yes to the UAC
choose C:\temp\adobe to extract the installation files, and click OK

When you get to this step, the files are extracted at C:\temp\adobe

Leave the installer as is for now
If you close it/ click install, it deletes all the files, so make copy of them before.
Customize the Installation
Open the Adobe Reader Customisation Wizard we installed earlier
Click on the open folder icon

Browse to the C:\temp\adobe folder and pick the AcroRead.MSI installer and press Open

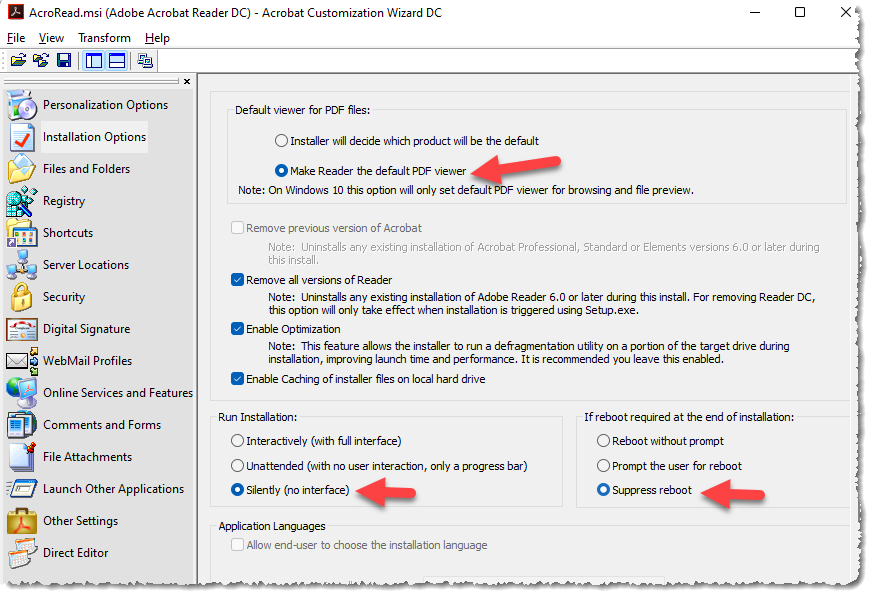
Now you can customize the installation, you can do this as you like, here are the settings I usually set;
i set the Suppress display of End User License Agreement (EULA) at Personalization Options

i Set Make Reader the default PDF viewer, Silently (No Interface) and Suppress rebot at Installation Options
i remove the shotcut on the desktop (right click and choose Remove) at Shotcuts

i Prevent end user from Configuring WebMail profile at the WebMail Profiles

If the users are not local administrator, or if we use another tool for patching third party apps, i disable the Product updates. Otherwise I leave this
And the upsell, Adobe Acrobat Documents Cloud services, Adobe Sign, send for Review and the Third party connectors for dropbox, google drive etc.

When you are satisfied with the settings that suits your organization, click on File and Save Package

Go back to the c:\Temp\adobe\ directory, you should see 2 new files .MST and .ref. this has been created by the wizard which contains our customisation

Now we have all the files we need, if you whant to, you can manually installing on a test machine, to test anything is okay. do this by running the following command: Setup.exe /s
Make a copy of the adobe folder and name it AdobeSetup before you close the Adobe reader DC installer from earlier.
Creating the Intune Win32 Application
Run the IntuneWinAppUtil.exe and enter in the following options:
- Source Folder: C:\temp\adobesetup
- Setup File: Setup.exe
- Output folder: C:\temp\AdobeReaderDC\

Go to endpoint.microsoft.com, click on Apps, then click add choose Windows app (win32) and click Select

choose the file we have created earlier and click OK

Fill out:
- Name: Adobe Acrobat Reader DC
- Description: **Adobe Acrobat Reader DC** software is the free global standard for reliably viewing, printing, and commenting on PDF documents
- Publisher: Adobe Systems Inc
- Information URL: https://www.adobe.com/acrobat/pdf-reader.html
And click Next

Fill out:
-
: Setup.exe /s
- Uninstall command: MsiExec.exe /x {AC76BA86-7AD7-1033-7B44-AC0F074E4100} /qn
- Device restart behavior: Determine behavior based on return codes
Click Next
Be aware the MSI ID in Uninstall command, can have changed since this guide was made, look at the bottom of this guide, to find out how to check this.

-
Operating system architecture: 32bit and 64bit
- Minimum operating system: Windows 10 1607
Click Next

choose Manually configure detection rules
Fill out;
-
Rule type: MSI
- MSI product code: {AC76BA86-7AD7-1033-7B44-AC0F074E4100}
Once again the MSI ID can have changed since this guide was made, look at the bottom of this guide, to find out how to check this.
Click OK, and then Next

Click Next at the Dependencies page
Click Next at the Supersedence (preview) page
Assign the app to your users in the

Click Create

How to vertify MSI ID
If you get an error in the Company Portal, and in Endpoint manager, the MSI ID has probably changed for a higher number, here is info how to find the new one
Error at the Company portal;

And in Endpoint manager;
We can see The application was not detected.

Open a Powershell on the device you have installed the app on, then type:
Get-WmiObject Win32_Product

Then Look for Adobe Acrobat Reader DC
At the IdentifyingNumber we get the MSI ID
Then Replace the old ID with the new at; detection rule and Uninstall command ID, and try agian 🙂